
- January 9, 2021
- Comments Disabled
Introduction
The cloud resume challenge is a multi-step resume project which is designed to build and demonstrate skills which are fundamental to pursuing a career in the cloud. The project was first published by Forrest Brazel a representative at A Cloud Guru and has since been adapted for AWS, Microsoft Azure and Google Cloud Platform.
Why I chose to take the Challenge
My willingness to learn, and expand my skills to aid my professional development, was one of the main reasons I decided to take this challenge. My secondary focus was to gain hands-on experience, allowing me to build a practical portfolio which would place me in a stronger position when applying for roles within the cloud. Learning the skills through self-study and certifications is only part of the battle, being able to demonstrate these skills shows an understanding beyond just memorisation.
The cloud resume challenge was unique in the sense that there are 16 steps, which one could argue are quite vague. However, the premise of the challenge is to get you to research and experiment with each area of the cloud with limited hand-holding. I can now see why the challenge recommends that you at least obtain one certification in the cloud platform you wish to take the challenge using. In my case, this was AWS as I had already achieved my AWS Cloud Practitioner.
Architecture
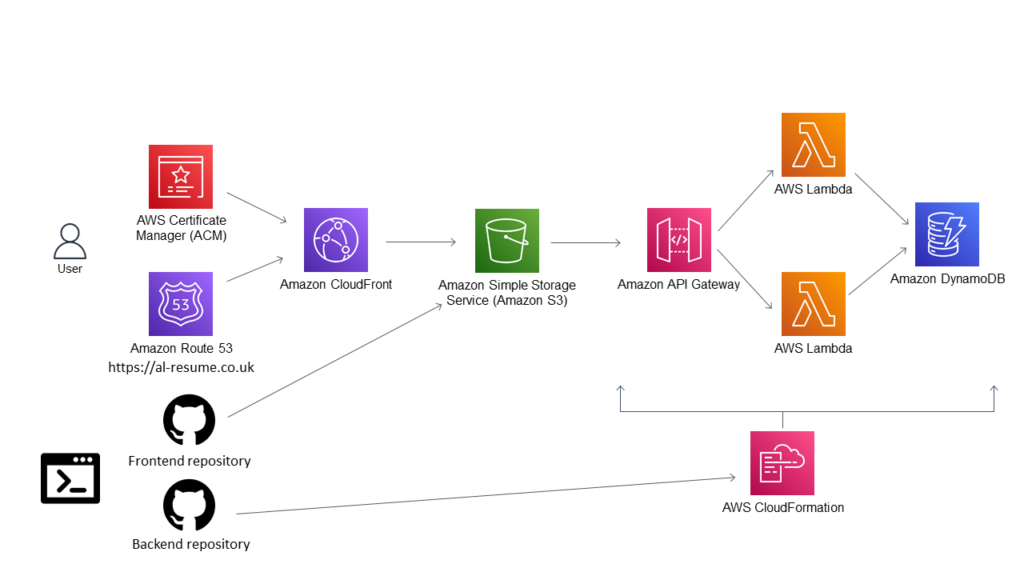
Taking the Challenge
Infrastructure as Code
This particular step was not the first within the challenge (it was step 12), however, I thought it would point me in the right direction for the rest of the project. Infrastructure as Code (IaC), was not a new phenomenon to me as I had some experience deploying Lamda functions using serverless for other projects. The challenge states, you should not deploy services within the AWS console, and instead, use AWS SAM. I thought it made more logical sense to set up a basic SAM python template which I could edit later down the line. Upon doing some research on SAM, I also came across AWS vault, which is a tool that allowed me to store my AWS credentials securely, and meant I could deploy to my cloud account without having to authenticate through AWS each time. My code editor of choice was Visual Studio Code, and this is where I opened my local repository. Upon doing some research on IaC, I came across the concept of “MakeFiles” and how they can be used as a shorthand for commands. A prime example of this is the command “sam build && aws-vault exec my-user –no-session – sam deploy”, which I was able to declare as “deploy-infra”.
HTML & CSS (FRONTEND)
The next step of the challenge was to create a website front which would form the visual side of the resume. This needed to be created using HTML & CSS. This was fairly straightforward for me, as I was able to utilize my experience as a web developer to model my resume. However, to make the development more efficient for this challenge I used some existing classes and bootstrap templates.
I was able to further style the resume in CSS to match my portfolio website. Once I was happy with the design, I now needed to deploy it to AWS. I referred back to my SAM template, to create an S3 bucket that would allow for public reads. This means that the contents of the bucket can be viewed in the form of a static website.
HTTPS & DNS
At this stage, most of the front end was now up and running. However the site was not only running insecurely with HTTP, but it also had a randomised Domain name which was not practical. The first step of this process was to create a CloudFront Distribution, which allowed me to cache my website and allow faster delivery to end users. In addition to this, I am also able to add an SSL certificate and enable HTTPS which is required for the security of the site. I referred back to my YAML template and set up a configuration for CloudFront, with the target ID being my S3 site/bucket. The next step was to purchase a custom domain name from Route53 and verify it with an SSL certificate. I used AWS ACM to validate this. I then needed to refer back to my YAML template so I could configure the hosted zones and point this to my CloudFront distribution, in addition to referencing the domain aliases within the distribution.
API & Python (BACKEND)
Now that most of the frontend of the resume had been developed, it was time to start working on the backend. As I began this project using infrastructure as code, some of the backend resources had already been deployed including a test API. Step 7-10 of the cloud resume challenge involves, writing JavaScript within your resume which keeps track of how many people have viewed your website. This value was stored within a database, and the value needed to be accessed and incremented using an API function. As per the challenge, I deployed a DynamoDB table within my YAML template as a means to store my visitor count. I set the billing mode to “pay per request” or on demand to avoid any large upfront billing costs. I set the table name to “cloud-resume-challenge”.
The next step of the challenge was to create the API functions (Python), which were to be used as an intermediary between the website and the database. The first function was a get request, which references the DynamoDB table by name and queries the Key “Visitors” and returns the count. However, whilst this would work in theory, I need to use the boto3 library which I was not too familiar with at the time of working on this project. Admittedly I still only know the basics of this library, but was able to gain enough insight to complete the API. The next API function that was required for the counter was incrimination. Similarly to the get function, I declared the database using boto3 and wrote an update function which will update the visitor by one each time the API is invoked. I ran into a few logical errors whilst doing this, however, I was able to find some helpful forums on stack overflow to guide me in the right direction. I then declared both functions within my YAML template and deployed these to AWS.
JavaScript
Now the APIs were set up, I needed to reference them within my resume’s index.html file. I created inline JavaScript, with a function that fetches (invokes) the PUT API function which updates the results. This is set to occur each time the resume loads or is refreshed. A second fetch (invoke) is made to the GET API which will return the current visitor counter. As it stands, the result will not be shown on the page had the script terminated here. Therefore, I needed to return the actual result by getting the element (visitor count) and its ID which is displayed back to the HTML body. I created a console log, so I could debug this in the inspector if needed. This was then deployed onto AWS.
Upon testing I ran into my first major issue, which was CORS (Cross-Origin Resource Sharing). All requests made to my API were being blocked and returning a result of null. To rectify this, I needed to gain an understanding of how CORS works concerning access control. I managed to find the correct syntax for JavaScript and added the necessary access control headers which will allow any request from any client to access the API.
Testing
Once the API was functioning as intended, the next step of the challenge was to run some tests on my Python code. I decided to run my tests using the bash commands within my Makefile. The test involved invoking the GET API and storing the value in variable (value 1), followed by using the “curl” command to rigger the PUT API, before using “curl” again to invoke the GET command and storing the updated value (value 2). These values were stored in variables and then compared using IF statements. If the test worked correctly, value 1 should be lower than value 2, if this is the case, “pass” would be displayed in the shell, otherwise “fail” would appear which would let me know there is an issue with or accessing the API.
CI/CD Pipelines
The last development stage of the challenge was to set up a CI/CD (continuous integration and deployment) pipeline. To do this, I set up a GitHub account and pushed both my local front and backend repositories to the GitHub repository. All of my development has been carried out within Visual Studio Code, so the link to my repository is seamless. The next step of the pipeline involved using GitHub actions, a feature which I had not used previously, so this required further research. I managed to gain an understanding of the syntax for GitHub actions, and create a pipeline which builds and deploys my infrastructure, followed by running an integration test and end-to-end test. I also have a separate branch which will upload my frontend site to my s3 bucket.
Summary
As the name suggests, the cloud resume challenge is in fact…a challenge. The project allowed me to build on my existing knowledge of AWS, and implement infrastructure that systems that I will come across while working within cloud platforms. I am satisfied with the final result and would recommend the challenge to anyone looking to develop their technical skills within the cloud. As with all projects, there are areas for improvement. The overall area for me would be the organisation of files, directories and code. Working through the challenge, my primary goal was to ensure everything worked, however, I could improve on this by considering efficiency within my code and organising my directory, with the latter being important for collaborative working. Another area for improvement would be to implement stricter CORS headers, as currently, they are quite loose with “allow all” rules applied. If I was to take this project further, I would try to implement a way to prevent duplicate page visits on the visitor counter. For example, as the project stands, I can keep refreshing the resume page and the counter will increase. But in reality, one person should only be allowed one view. A potential way to resolve this would be to utilise an algorithm that could restrict IP addresses to only contribute one view. this is definitely, something I would be interested to delve into.